


Implement a Stack Using a Linked List
In the previous part, we implemented a stack with an array. In this part, I will show you how to program a stack using a singly linked list.
The Algorithm – Step by Step
The algorithm is quite simple: A top reference points to a node that contains the top element of the stack and a next pointer to the second node. This node, in turn, contains the second element and a pointer to the third node, and so on. The last node contains the bottom element of the stack; the next reference of the last node is null.
The following image shows an example stack on which the elements "apple", "orange", and "pear" (in that order) have been pushed:

But how do we get there?
Enqueue Algorithm
Let's start with an empty stack. The top reference is initially null:

To push the first element onto the stack, we wrap it in a new node and let top point to that node:

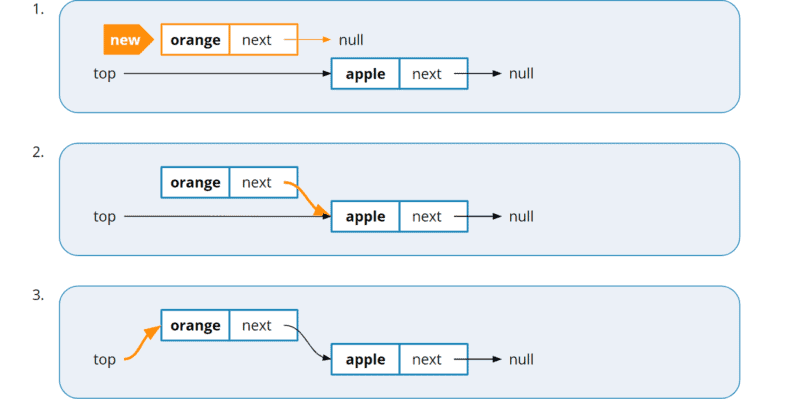
We insert each additional element between top and the first node. For this, we need three steps:
- We create a new node and wrap it around the element to be inserted.
- We let the
nextreference of the new node point to the same node astop. - We let
toppoint to the new node.
The following image shows the three insertion steps:
Dequeue Algorithm
To retrieve an element with pop(), we proceed as follows:
- We memorize the element of the node to which
toppoints ("orange" in the example). - We change the
topreference to the node referenced bytop.next. - We return the element memorized in step 1.
- In a language with a garbage collector (e.g., Java), the GC care of deleting the node that is no longer referenced. In languages without a garbage collector (e.g., C++), we have to do it ourselves.
The following image shows the four steps:

The dashed frame around the "orange" node in the second and third step is to indicate that this list node is no longer referenced.
Source Code for the Stack with a Linked List
The following source code shows the implementation of the stack using a linked list (LinkedListStack class in the GitHub repo). You can find the class for the nodes, Node, at the end of the source code as a static inner class.
public class LinkedListStack<E> implements Stack<E> {

  private Node<E> top = null;

  @Override
  public void push(E element) {
    top = new Node<>(element, top);
  }

  @Override
  public E pop() {
    if (isEmpty()) {
      throw new NoSuchElementException();
    }
    E element = top.element;
    top = top.next;
    return element;
  }

  @Override
  public E peek() {
    if (isEmpty()) {
      throw new NoSuchElementException();
    }
    return top.element;
  }


  @Override
  public boolean isEmpty() {
    return top == null;
  }

  private static class Node<E> {
    final E element;
    final Node<E> next;

    Node(E element, Node<E> next) {
      this.element = element;
      this.next = next;
    }
  }
}Code language: Java (java)
You can see an example of how the LinkedListStack class is used in the StackDemo demo program.
Advantages and Disadvantages of Implementing the Stack Using a Linked List
Implementing a stack with a linked list has the following advantages over the array variant: it does not waste memory with unoccupied array fields, and it does not require resizing the array by copying the entire array.
The node objects, in turn, occupy more memory than a single field in an array. Creating node objects takes more time than setting an array field. A linked list also causes more work for the garbage collector since it must follow the complete list on each pass.
As a rule, the advantages of the array implementation outweigh the disadvantages, so you'll find the array implementation more often.
Outlook
In the next part of the tutorial, I'll show you how to implement a stack with a queue.
If you still have questions, please ask them via the comment function. Do you want to be informed about new tutorials and articles? Then click here to sign up for the HappyCoders.eu newsletter.