Ansible Tutorial: Setting up Docker, MySQL, and WordPress with Ansible [Updated 2020]

Article Series: Ansible Tutorial
Part 1: Setting up a Server with Ansible
Part 2: User Accounts, SSH, and Firewall
Part 3: Docker, MySQL, and WordPress
Part 4: HAProxy + HTTPS from Let’s Encrypt
(Sign up for the HappyCoders Newsletter
to be immediately informed about new articles.)
In the first two parts of this tutorial series, I showed you how I installed the operating system image with Ansible on a root server of Hetzner and created user accounts, optimized the SSH configuration and configured the firewall. In this third part of the Ansible tutorial, I will show you how to install Docker with Ansible and – on top of that – MySQL and WordPress as Docker containers. Since this is much easier than I thought, this article will be shorter than the previous ones.
As always, you can find the code to the article in my GitLab repository: https://gitlab.com/SvenWoltmann/happycoders-tutorial-server-setup
And in addition to the article, there is again a (German-only) video tutorial: Setup of Docker, MySQL, and WordPress with Ansible
Why WordPress?
First of all, you might ask yourself why I, as a Java developer, am using a content management system developed in PHP. The answer is: it has the largest market share (almost 60 percent), meets all my requirements, is quick to set up, expandable with thousands of plugins and themes and has excellent community support. Here is a detailed comparison of WordPress with Joomla and Drupal.
In the Java area, there are hobby projects on the one hand, and heavyweights such as Magnolia, OpenCMS or Bloomreach Experience Manager (formerly Hippo CMS) on the other, which are more geared to the needs of large companies. These are much more complex to set up, and, due to low market share (less than one percent), the support community is also many times smaller.
I would like to install the whole thing as a Docker container and of course again via Ansible.
Installing Docker
First of all, I need to install Docker. To do this, I'll use an Ansible role from Jeff Geerling again: Docker Ansible Role. The role is installed as follows (on my developer machine – not the server):
ansible-galaxy install geerlingguy.dockerCode language: plaintext (plaintext)
To run the role on my server, I add the entry gerlingguy.docker to the array roles in the happy1.yml file, which I created in the previous article in the series. The file now looks like this:
---
- hosts: happy1.happycoders.eu
  vars:
    ansible_port: "{{ ssh_port | default('22') }}"
  remote_user: sven
  become: yes
  roles:
    - hostnames
    - users
    - ssh
    - aliases
    - tools
    - geerlingguy.firewall
    - geerlingguy.dockerCode language: YAML (yaml)
I would like to decide for myself which Docker and Docker Compose versions will be installed. I can do this using the docker_package and docker_compose_version variables. This is how I find the version numbers:
- I can't easily find the Docker version in advance because the Docker repository hasn't been installed yet. However, I can also run the role without specifying a version, which will automatically install the latest version. I can fill in the version number later.
- Docker Compose version: I can find this on the Docker Compose page in GitLab. At the current time (September 2018), this is 1.22.0.
At first, I leave out the Docker version number, which I would write behind docker-ce. I enter the Docker Compose version number into my host variable file host_vars/happy1.happycoders.eu as follows:
docker_package: docker-ce
docker_compose_version: 1.22.0Code language: SubUnit (subunit)
I also want to use Docker as the sven user, and for this, I need the following entry directly below:
docker_users:
  - svenCode language: YAML (yaml)
Now I run the playbook as follows:
ansible-playbook happy1.ymlCode language: plaintext (plaintext)This time, you have to be patient – the task "Install Docker" can take up to ten minutes.

Now I can easily find out which Docker version was installed with dpkg -s docker-ce | grep Version:

I append this version with an equal sign to the docker_package variable, so that my host variable file host_vars/happy1.happycoders.eu now contains the following entries regarding Docker:
docker_package: docker-ce=18.06.1~ce~3-0~debian
docker_compose_version: 1.22.0
docker_users:
  - svenCode language: YAML (yaml)
It is not necessary to run the playbook again, as the latest version is already installed. The installation of Docker is now complete.
Ansible Firewall and Docker Rules
It is important to note at this point that Docker adds some iptables entries:

These are, unfortunately, deleted by running the Ansible firewall role, which I configured in the "Firewall with Ansible" tutorial. The problem is known (https://github.com/geerlingguy/ansible-role-docker/issues/21), but the workaround specified there does not work: contrary to the developer's explanation, Docker is not restarted after the firewall has been restarted, but only when Docker has been updated. Therefore, it is currently necessary to manually restart Docker using service docker restart when the firewall rules have been changed.
My opinion:
A Docker restart is not problematic because the actual containers are not restarted. However, there is an interruption of the service for a few seconds, which is acceptable for a private blog. This would not be acceptable for a large corporate site. There, the better solution would be that the firewall role does not delete the firewall rules and create them completely from scratch, but instead adds new ones and deletes those that are no longer needed. Maybe I'll take that up in a future article.
Installing MySQL and WordPress
For the installation of WordPress, I follow this article: Quickstart: Compose and WordPress. Therefore, I create an Ansible role wordpress_docker and copy the docker-compose.yml from the above article into the template roles/wordpress_docker/templates/docker-compose.yml.j2 (you will find the code below).
I change the port from 8000 to 8001 because I will need port 8000 in the next article for Certbot, and I found no way to change the Certbot port.
I want to extract the MySQL version and the passwords into variables. But the passwords shouldn't be stored in plain text. Therefore, I encrypt them with ansible-vault. With the following command, I encrypt the password 123456 and store it in the variable mysql_root_password:
ansible-vault encrypt_string '123456' --name 'mysql_root_password'Code language: plaintext (plaintext)I also encrypt the password for the wordpress user. Of course, you should replace the sample passwords with your own passwords.

I copy the MySQL version from docker-compose.yml and the just encrypted passwords into my host variable file. The depth of the indentation under the variable names (starting with $ANSIBLE_VAULT) is not important, so it is sufficient to insert two spaces before the variable names if you want to group the password variables under a parent variable:
wordpress_docker:
  mysql_version: 5.7
  mysql_root_password: !vault |
          $ANSIBLE_VAULT;1.1;AES256
          38616139646531363566313766663636356431366433356162353835653565363665646633306665
          3738303831333335636532306565653939343862636336630a643135643935313737633235323464
          38316464633238376636366263376462626438633139363465393736363462303864353864646638
          6637396439303565340a376165306664353332363866356130313939366334363732653862663466
          3838
  mysql_wordpress_password: !vault |
          $ANSIBLE_VAULT;1.1;AES256
          36356366653534343766383734343865616235636238333239396236623035656237623361653837
          6432613033663832313837306539666235313837663431350a396231336131663235326466386135
          65376633333963393663613562363039623030623334666161383362356237613234393162626135
          6530323134636530300a626363613661663662353435396232363936343136636566333566393835
          3738
  wordpress_version: latestCode language: YAML (yaml)
The finished template roles/wordpress_docker/templates/docker-compose.yml.j2 looks like this:
version: '3.3'

services:
  db:
    image: mysql:{{ wordpress_docker.mysql_version }}
    volumes:
      - db_data:/var/lib/mysql
    restart: always
    environment:
      MYSQL_ROOT_PASSWORD: {{ wordpress_docker.mysql_root_password }}
      MYSQL_DATABASE: wordpress
      MYSQL_USER: wordpress
      MYSQL_PASSWORD: {{ wordpress_docker.mysql_wordpress_password }}

  wordpress:
    depends_on:
      - db
    image: wordpress:latest
    ports:
      - "8001:80"
    restart: always
    environment:
      WORDPRESS_DB_HOST: db:3306
      WORDPRESS_DB_USER: wordpress
      WORDPRESS_DB_PASSWORD: {{ wordpress_docker.mysql_wordpress_password }}
volumes:
  db_data:
Code language: YAML (yaml)
Tasks
I have not yet created any tasks for the wordpress_docker role. I will do that now. There is not much to do: create a directory, copy the docker-compose.yml file and call docker-compose up. I do this with the following three tasks in the file roles/wordpress_docker/tasks/main.yml:
Task 1 – Create directory:
---
- name: Create docker/wordpress directory
  file:
    path: /opt/docker/wordpress
    state: directory
    owner: root
    group: root
    mode: 0755Code language: YAML (yaml)
Task 2 – Copy docker-compose file:
- name: Create docker-compose file
  template:
    src: docker-compose.yml.j2
    dest: /opt/docker/wordpress/docker-compose.yml
    owner: root
    group: root
    mode: 0644Code language: YAML (yaml)
Task 3 – Execute docker-compose up:
- name: Run docker-compose up -d
  shell: docker-compose up -d
  args:
    chdir: /opt/docker/wordpress/Code language: YAML (yaml)
The used Ansible modules file, template and shell were explained in the previous articles.
Opening the Firewall
I have configured the WordPress Docker container to be accessible on port 8001. I have to open this port temporarily in the firewall to test the WordPress installation. Temporarily because in the next article, I will set up HAProxy to redirect port 80 to 8001, and then I can close port 8001 again for external access.
To open the port, I have to add the value 8001 to the array firewall_allowed_tcp_ports in the host variable file so that the entry now looks like this:
firewall_allowed_tcp_ports:
  - 80
  - 443
  - 5930
  - 8001Code language: YAML (yaml)
Running the Playbook
If I tried to run the playbook now, it would abort with an error message, "Failed to program FILTER chain: iptables failed […]". I have mentioned the reason above: Changing the firewall rules deletes the Docker rules, so the attempt to call docker-compose up fails. I will therefore temporarily comment out the wordpress_docker role in the playbook happy1.yml by prefixing it with a #:
# - wordpress_dockerCode language: YAML (yaml)Now I can run the playbook to first change the firewall rules:
ansible-playbook happy1.ymlCode language: plaintext (plaintext)I won't insert a screenshot this time. The following two tasks report the status "changed":
- geerlingguy.firewall : Copy firewall script into place.
- geerlingguy.firewall : restart firewall
I now log on to the server in order to
- check if port 8001 has been opened,
- restart the Docker service, and to
- check if the Docker firewall rules are active again:
ssh -p 5930 [email protected]
sudo iptables -L
sudo service docker restart
sudo iptables -LCode language: plaintext (plaintext)
It's all what I expected: port 8001 was opened, and the Docker settings were missing at first. After restarting Docker, these settings are present again.
Now I can reactivate the previously commented wordpress_docker role in the playbook happy1.yml and run the playbook again. This time, I have to add the parameter --ask-vault-pass so that Ansible can decrypt the encrypted passwords:
ansible-playbook --ask-vault-pass happy1.ymlCode language: plaintext (plaintext)
It'll take a while for the containers to run. The progress can be monitored on the server as follows:
cd /opt/docker/wordpress
docker-compose logs -fCode language: plaintext (plaintext)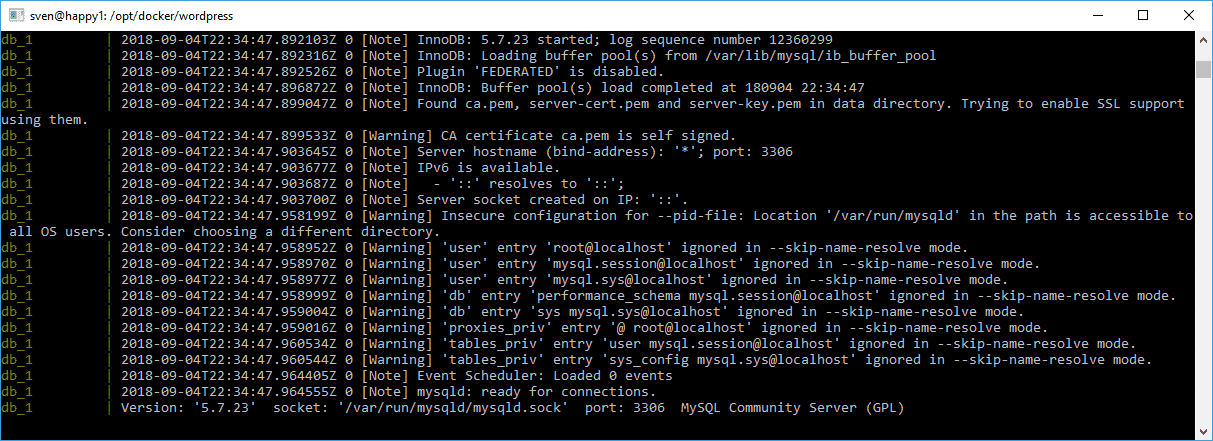
I'll ignore the warnings for now. After about a minute, the message appears that the database is ready for connections. The WordPress installation is now available at http://happy1.happycoders.eu:8001:

Persistent Data of the Docker Containers
Where are the data of the Docker containers located? In the docker-compose file of the db container, the directory /var/lib/mysql was mounted to the volume db_data. But where exactly is this volume? To find out, I first determine the container ID using docker ps and then run docker inspect -f '{{ .Mounts }}' <container ID> to read the mountpoint:

So the MySQL data is located at /var/lib/docker/volumes/wordpress_db_data/_data and would survive deleting and re-creating the db container. And the data of the WordPress container? There is no volume mounted in the docker-compose file, but docker inspect shows me a mountpoint:

Where is this mountpoint set? Very simple: in the Dockerfile file of the WordPress image. The WordPress files are therefore also persistent. In addition, I will, of course, install a good backup plugin, which will not only back up the WordPress installation but also the MySQL database.
[Update] Upgrading PHP within the Docker WordPress Container
When I wrote this article, the WordPress Docker image was created based on PHP 7.2. Currently, the image is based on PHP 7.3, but it is not easy – and not necessary – to upgrade PHP within the WordPress container.
Instead, you can upgrade the WordPress image itself to get the latest PHP version.
Just download the latest WordPress image:
docker pull wordpressCode language: plaintext (plaintext)Then change to the directory where the docker-compose file is located and update the container. You do not need to worry about your wp-content directory; it is safely located in a volume outside the container (as demonstrated in the previous section).
cd /opt/docker/wordpress
docker-compose up -dCode language: plaintext (plaintext)
That's all – your website now runs on the latest PHP version.
Summary and Outlook
In this third article of the series, I showed how to install Docker with Ansible and how to install and start MySQL and WordPress as Docker images using a docker-compose file.
I will not go deeper into the configuration of WordPress here. You will find enough reading material on the internet. But I'd like to share with you the theme and a list of the plugins I use for this blog.
[Update: I have updated this list in April 2020 because I have replaced some plugins over time - either for legal reasons (e.g., the cookie notice) or because other plugins do the job much better (e.g., SEOPress instead of Yoast SEO). In brackets, you can find the formerly used plugins.]
- Theme: Thrive Theme Builder (initially: Astra Pro – Thrive Theme Builder was first released in 2020, and I installed it right away, as it allows for entirely free design of all pages)
- Anti-Spam: Antispam Bee
- Removing superfluous HTML, CSS and JavaScript code: Asset CleanUp Pro
- Cookie notice: Borlabs Cookie (initially: Cookie Notice for GDPR – replaced for legal reasons)
- Source code syntax highlighter: EnlighterJS
- Compressing image files: Imagify (before: reSmush.it Image Optimizer – replaced because Imagify produces much better results)
- Finding and deleting unused files: Media Cleaner
- Social share icons in articles: Sassy Social Share
- SEO support: SEOPress PRO (initially: Yoast SEO – replaced because SEOPress provides more and better functionality)
- Google Analytics integration: Site Kit by Google (initially: Google Analytics Dashboard for WP – replaced because Google has launched its own plugin, which displays additional and more detailed data)
- Support for SVG graphics: SVG Support
- Table of contents in articles: Table of Contents Plus
- Design of the homepage and other pages: Thrive Architect
- Newsletter signup forms: Thrive Leads
- Testimonials: Thrive Ovation
- Additional design elements: Ultimate Addons for Gutenberg
- Backups: UpdraftPlus - Backup/Restore
- Security: Wordfence Security
- Cache and other performance optimizations: WP Rocket (initially: WP Fastest Cache and WP-Optimize – replaced because WP Rocket combines the functionality of both plugins in one)
- Support for multiple languages: WPML (initially: Polylang – replaced because some other plugins only support WPML; other than that, WPML has no advantages over Polylang)
I have removed these plugins without replacement:
- Sticky navigation bar: myStickymenu (removed because I found the sticky navigation to be superfluous)
- Social media follow icons in the footer: Easy Social Icons (removed; I now integrate them as HTML code and thus save a plugin)
- FancyBox: Easy FancyBox (removed because I do not need the functionality)
- Duplicating posts to translate them: Duplicate Post (removed because this function is included in WPML)
That concludes this article. In the fourth and final part, I will set up HAProxy and a free HTTPS certificate from Let's Encrypt, so that the website will be accessible via the standard HTTP/HTTPS ports.
If you liked this third part of the series, feel free to leave me a comment or share the article using one of the share buttons at the end.
Do you want to be informed when new articles are published on HappyCoders.eu? Then click here to sign up for the HappyCoders.eu newsletter.