


How to Change Java Versions in Windows
(updated for Java 25)
In this article, I will show you how to install multiple Java versions on Windows and how to change the Java version on the command line and in PowerShell:
To enable these Java version change commands on your system as well, follow this step-by-step guide.
Let's go…
Step 1: Installing Multiple Java Versions
Installing multiple Java versions in parallel is incredibly easy in Windows. You can download and run the installer for each version, which automatically installs the versions in separate directories.
Download Sources
- Java SE 1.1 – You can no longer install this version on 64-bit Windows.
- Java SE 1.2 – Installed to
C:\jdk1.2.2\andC:\Program Files (x86)\JavaSoft\JRE\1.2\by default – I recommend changing this toC:\Program Files (x86)\Java\jdk1.2.2\andC:\Program Files (x86)\Java\jre1.2.2\for the sake of clarity. - Java SE 1.3 – Installed to
C:\jdk1.3.1_28\by default – I recommend changing this toC:\Program Files (x86)\Java\jdk1.3.1_28\. - Java SE 1.4 – Installed to
C:\j2sdk1.4.2_19\by default – I recommend changing this toC:\Program Files (x86)\Java\jdk1.4.2_19\.
Starting with the following versions, you don't need to change the default installation directories:
- Java SE 5
- Java SE 6
- Java SE 7
- Java SE 8
- Java SE 9 / OpenJDK 9
- Java SE 10 / OpenJDK 10 (→ The most important new features in Java 10)
Attention – you may use the following Oracle distributions only for private purposes and development:
- Java SE 11 / OpenJDK 11 (→ The most important new features in Java 11)
- Java SE 12 / OpenJDK 12 (→ The most important new features in Java 12)
- Java SE 13 / OpenJDK 13 (→ The most important new features in Java 13)
- Java SE 14 / OpenJDK 14 (→ The most important new features in Java 14)
- Java SE 15 / OpenJDK 15 (→ The most important new features in Java 15)
- Java SE 16 / OpenJDK 16 (→ The most important new features in Java 16)
- Java SE 17 / OpenJDK 17 (→ The most important new features in Java 17)
- Java SE 18 / OpenJDK 18 (→ The most important new features in Java 18)
- Java SE 19 / OpenJDK 19 (→ The most important new features in Java 19)
- Java SE 20 / OpenJDK 20 (→ The most important new features in Java 20)
- Java SE 21 / OpenJDK 21 (→ The most important new features in Java 21)
- Java SE 22 / OpenJDK 22 (→ The most important new features in Java 22)
- Java SE 23 / OpenJDK 23 (→ The most important new features in Java 23)
- Java SE 24 / OpenJDK 24 (→ The most important new features in Java 24)
The following version is currently an early access build. You should use it only for testing purposes:
- JDK 25 Early-Access Build (→ The most important new features in Java 25)
Step 2: Define Java Environment Variables
The following two environment variables decide which Java version an application uses:
JAVA_HOME– many start scripts use this variable.Path– is used when running a Java binary (such asjavaandjavac) from the console.
These variables should always point to the same Java installation to avoid inconsistencies. Some programs, such as Eclipse, define the Java version in a separate configuration file (for Eclipse, for example, this is the entry "-vm" in the eclipse.ini file).
Manually Setting the Java Environment Variables
The Java installers create various environment variables, which you need to clean up first (see below). The fastest way to change the environment variables is to press the Windows key and type "env" – Windows then offers "Edit the system environment variables" as a search result:
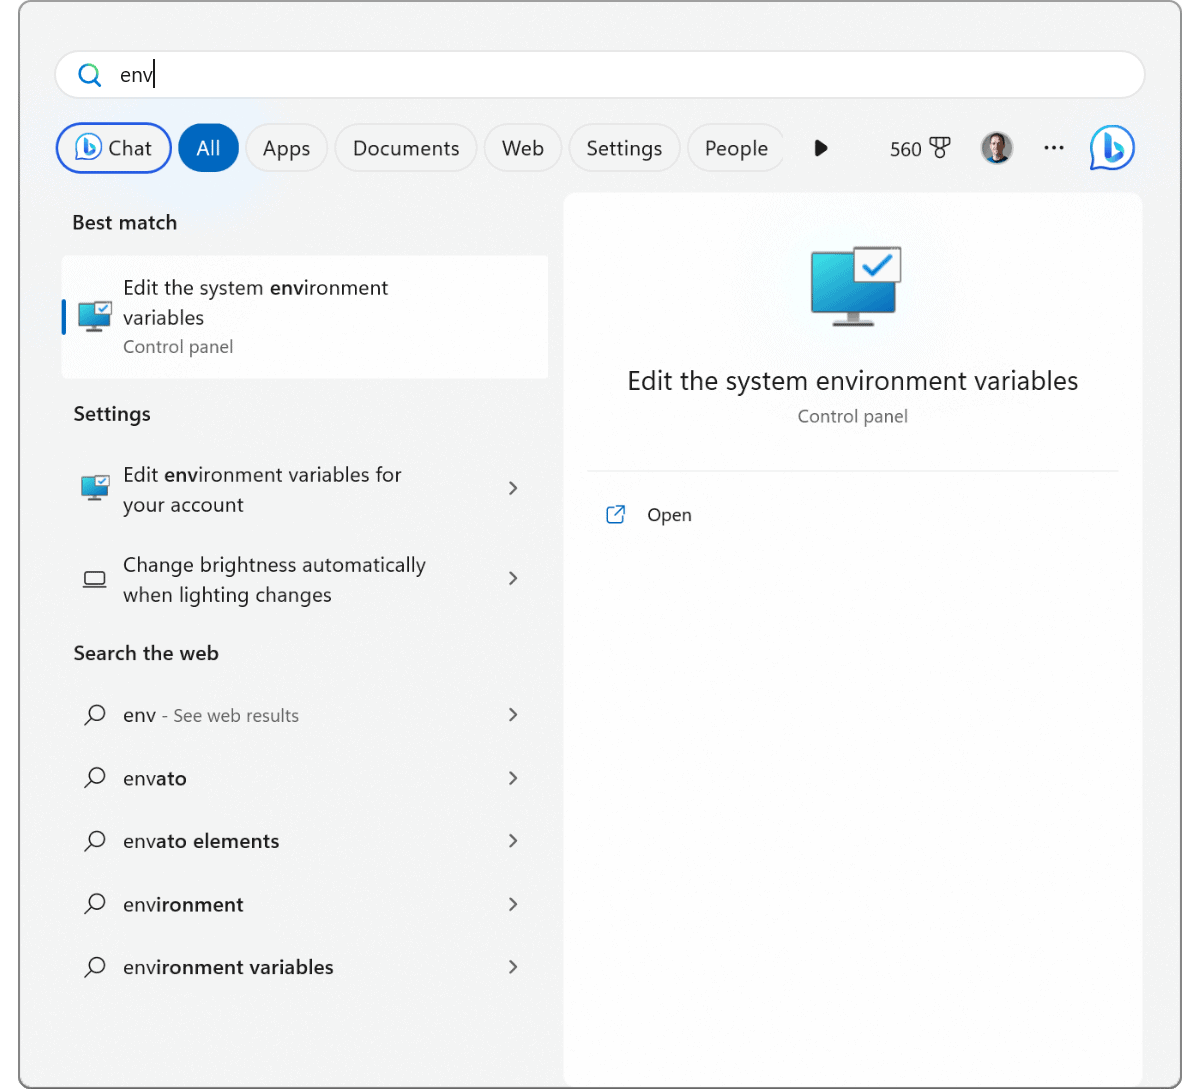
At this point, you can press "Enter" to open the system properties:
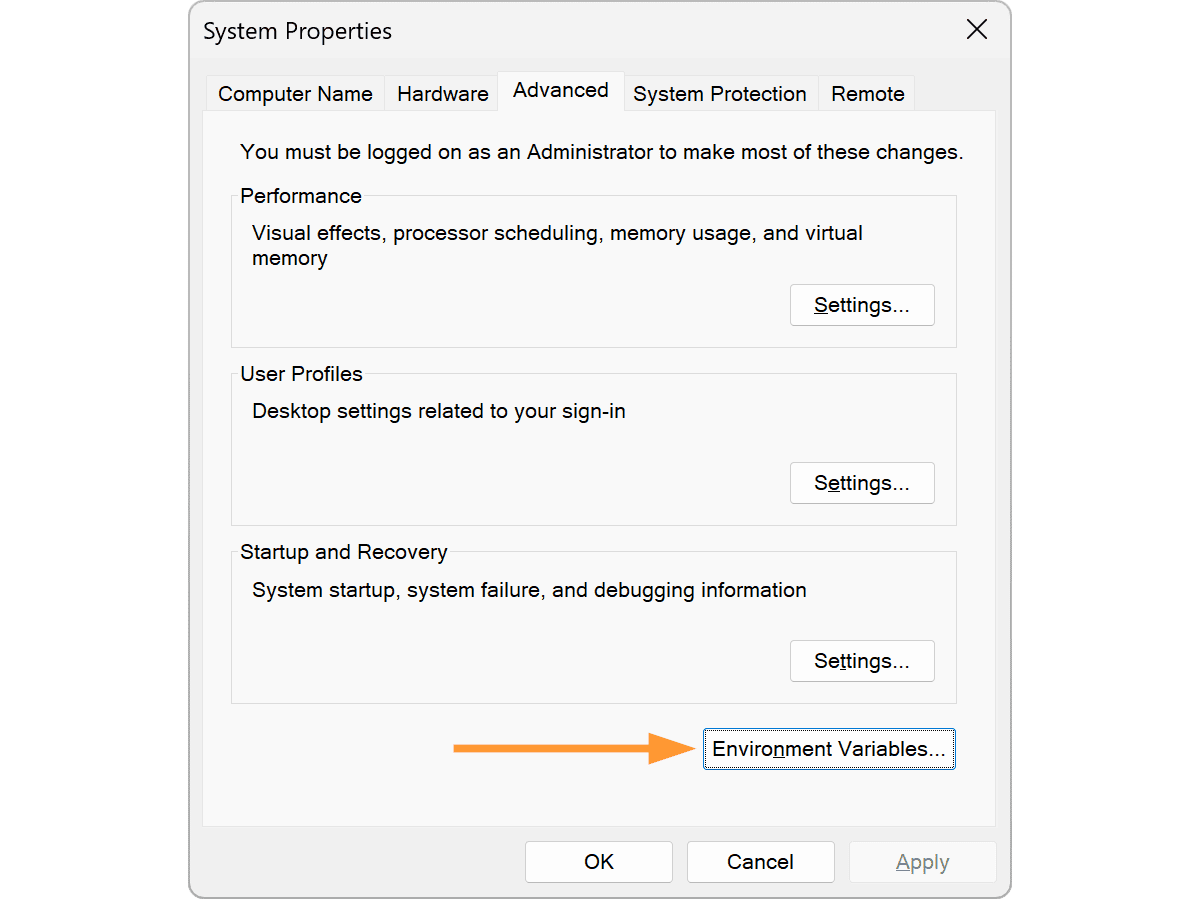
Click on "Environment Variables…" and the following window opens:

As the default version, I recommend the current release version, Java 24. Accordingly, you should make the following settings:
- The top list ("User variables") should not contain any Java-related entries.
- The lower list ("System variables") should contain an entry "JAVA_HOME = C:\Program Files\Java\jdk-24". If this entry does not exist, you can add it with "New…". If it exists but points to another directory, you can change it with "Edit…".
- Delete the following entries under "Path" (if they exist):
C:\ProgramData\Oracle\Java\javapathC:\Program Files (x86)\Common Files\Oracle\Java\javapath
- Insert the following entry instead:
%JAVA_HOME%\bin
The entry should then look like the following (the other entries in the list will probably look different for you since you have other applications installed than I do):
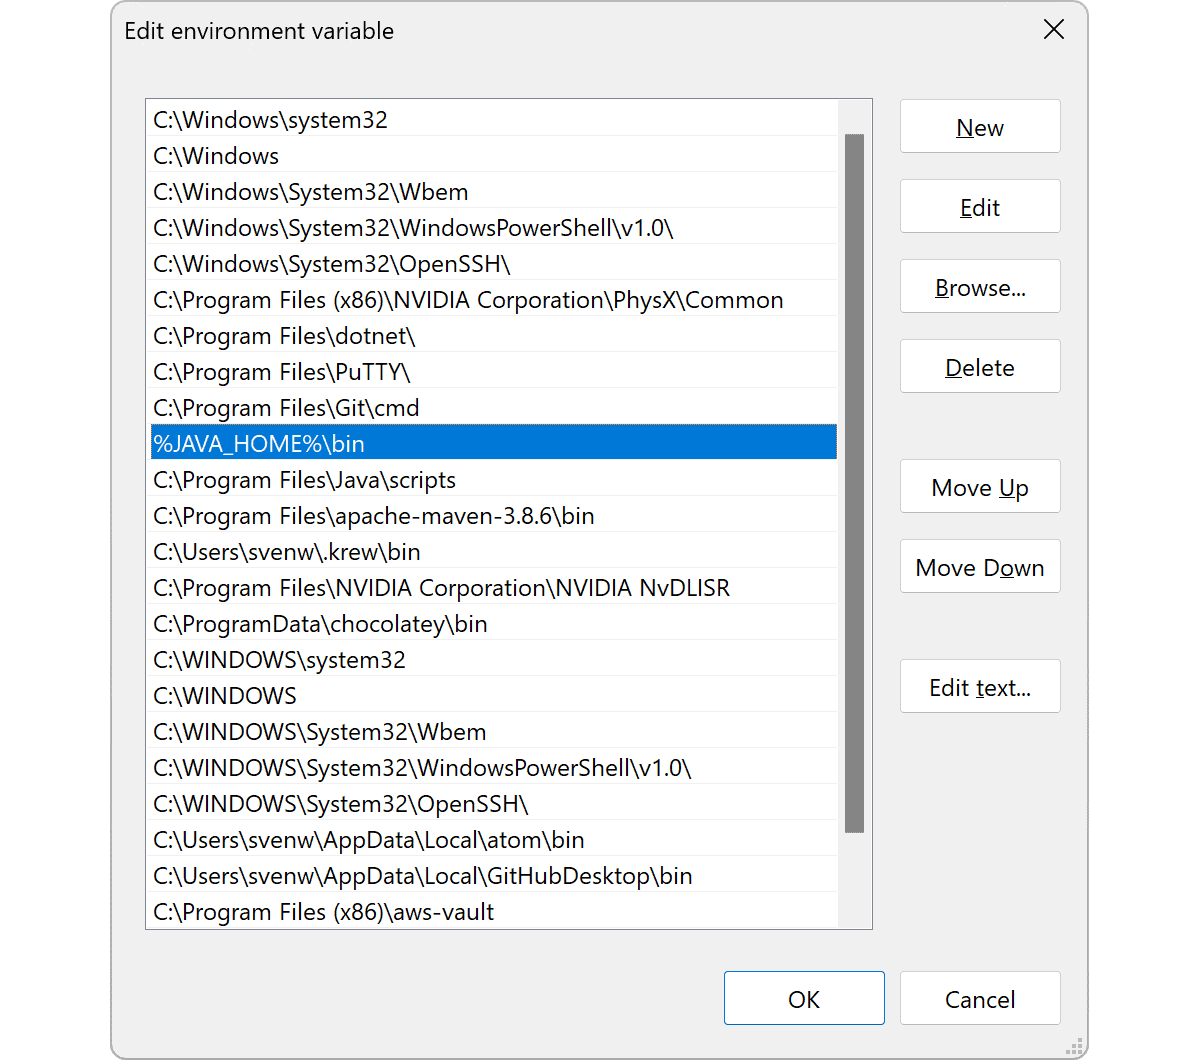
The last entry ensures that Path and JAVA_HOME are automatically consistent.
Attention: this only works for the default setting configured here. If you change JAVA_HOME via the command line, you have to adjust Path accordingly. But don't worry – the scripts you can download in the next step will do that automatically.
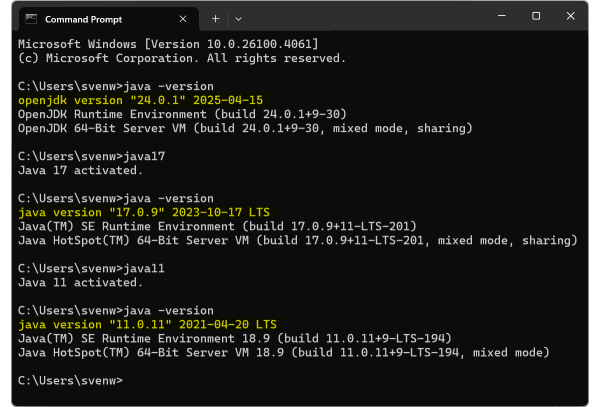
How to Check Your Java Version on Windows
Now open a command line to check the settings with the following commands:
echo %JAVA_HOME%
java -versionCode language: plaintext (plaintext)
Here's what you should see:

Step 3: Install the Scripts to Change the Java Version
To change the Java version on the command line, I have prepared some batch files that you can copy to your system. Here is the link: scripts-up-to-java25.zip
The ZIP file contains scripts named
java25.bat,java24.bat,java23.bat, etc., for all Java versions,- the corresponding files
java25.ps1,java24.ps1, etc. for PowerShell, - plus two common scripts
javaX.batandjavaX.ps1.
I suggest you unpack the scripts to C:\Program Files\Java\scripts.
The scripts look like this:
java25.bat:
@echo off
call javaX "Java 25" %1Code language: DOS .bat (dos)
java25.ps1
javaX "Java 25" $args[0]
Code language: PowerShell (powershell)javaX.bat:
@echo off

if %1 == "Java 1.2" set JAVA_HOME=C:\Program Files (x86)\Java\jdk1.2.2
if %1 == "Java 1.3" set JAVA_HOME=C:\Program Files (x86)\Java\jdk1.3.1_28
...
if %1 == "Java 23" set JAVA_HOME=C:\Program Files\Java\jdk-23
if %1 == "Java 24" set JAVA_HOME=C:\Program Files\Java\jdk-24
if %1 == "Java 25" set JAVA_HOME=C:\Program Files\Java\jdk-25

if "%~2" == "perm" (
  setx JAVA_HOME "%JAVA_HOME%" /M
)

set Path=%JAVA_HOME%\bin;%Path%

echo %~1 activated.Code language: DOS .bat (dos)javaX.ps1:
param ($javaVersion, $perm)

switch ($javaVersion) {
  "Java 1.2" { $env:JAVA_HOME = "C:\Program Files (x86)\Java\jdk1.2.2" }
  "Java 1.3" { $env:JAVA_HOME = "C:\Program Files (x86)\Java\jdk1.3.1_28" }
  ...
  "Java 23" { $env:JAVA_HOME = "C:\Program Files\Java\jdk-23" }
  "Java 24" { $env:JAVA_HOME = "C:\Program Files\Java\jdk-24" }
  "Java 25" { $env:JAVA_HOME = "C:\Program Files\Java\jdk-25" }
}

if ($perm -eq "perm") {
  [Environment]::SetEnvironmentVariable("JAVA_HOME", $env:JAVA_HOME, [System.EnvironmentVariableTarget]::Machine)
}

$env:Path = $env:JAVA_HOME + '\bin;' + $env:Path

Write-Output "$javaVersion activated."Code language: PowerShell (powershell)
In the files javaX.bat and javaX.ps1, you probably have to adjust some paths to the installed Java versions.
The scripts update the JAVA_HOME environment variable and insert the bin directory at the beginning of the Path variable. That makes it the first directory to be searched for the corresponding executable when you run Java commands such as java or javac.
(The Path variable gets longer with each change. Do not worry about it. This only affects the currently opened command line.)
Step 4: Add the Script Directory to the Path
To be able to call the scripts from anywhere, you have to add the directory to the "Path" environment variable (just like you did with "%JAVA_HOME%\bin" in the second step):

If you have installed the latest releases of all Java versions, you can use the scripts without any further adjustments. Open a new command line or PowerShell and enter, for instance, the following commands:

If one of the commands does not activate the expected Java version, please check if the path in the javaX.bat and javaX.ps1 files corresponds to the installation path of the Java version you want to activate.
Temporary and Permanent Java Version Changes
The commands presented up to this point only affect the currently opened command line or PowerShell. As soon as you open another command line, the default version defined in step 2 is active again (Java 24, if you have not changed anything).
If you want to change the Java version permanently, just add the parameter "perm" to the corresponding command, e.g.
java24 perm
Attention: To set the Java version permanently, you must open the command line or PowerShell as an administrator. Otherwise, you will get the error message "ERROR: Access to the registry path is denied.
What You Should Do Next…
I hope you were able to follow the instructions well and that the commands work for you.
Now I would like to hear from you:
Were you able to follow the steps well – or do you have unanswered questions?
Either way, let me know by leaving a comment below.