
In this last part of the stack tutorial, I’ll show you how to reverse the order of the elements of a stack using only recursion (i.e., no iteration).
Like the implementation of a stack with queues, the algorithm shown in this article primarily has a training character. Therefore: You may want to come up with a solution yourself first.
The Solution – Step by Step
We solve the task using two methods, which I will explain in the following two sections.
1. The reverse() Method
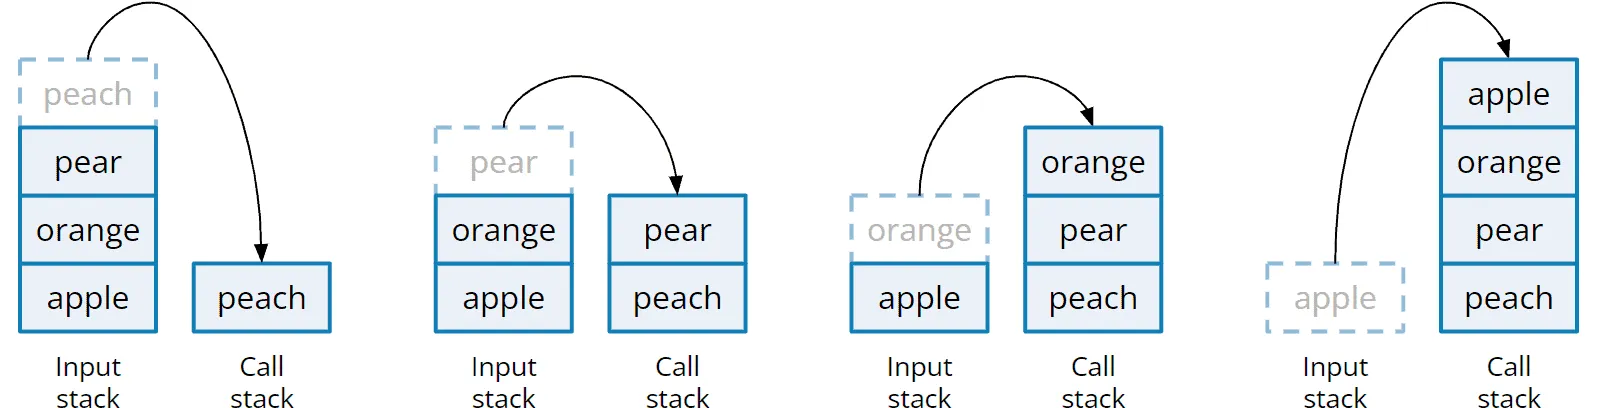
We first implement a reverse() method that proceeds as follows:
Step 1:
As long as elements are on the input stack, we take them off the stack and recursively call the reverse() method. This moves all elements from top to bottom to the call stack:
Step 2:
When exiting the recursion, we move the elements from the call stack back to the target stack – but in reverse order!
To do this, we create a method called insertAtBottom() to insert an element at the bottom of a stack. (You’ll see how this method works in the next section).
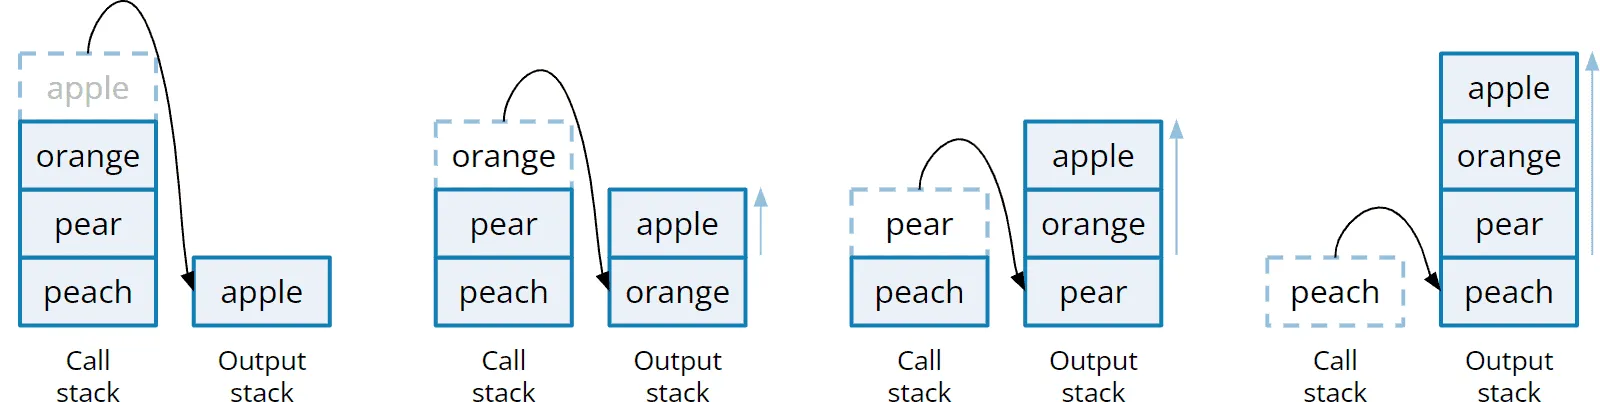
Done. The destination stack contains the elements of the input stack in reverse order.
2. The insertAtBottom() Method
But how to insert elements at the bottom of the stack?
For this purpose, we implement a second method – insertAtBottom(). For this one, too, we exclusively employ recursion.
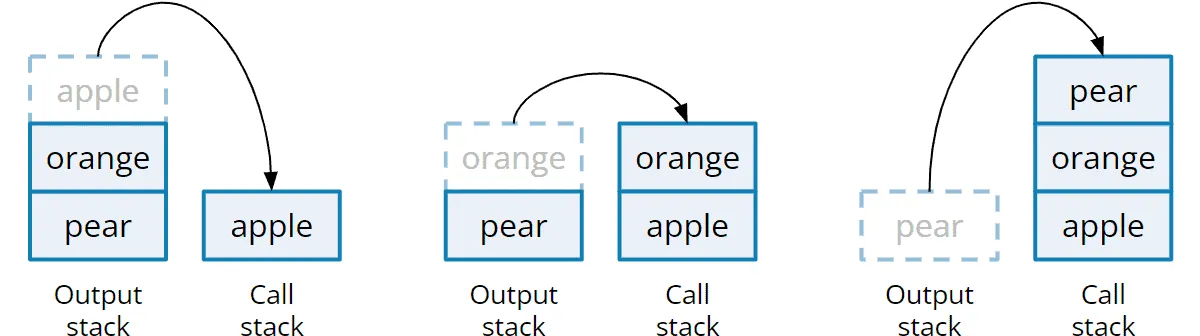
The following images show the last insertAtBottom() invocation of the previous diagram. That is, the call where the element “peach” is inserted at the bottom of the target stack, which already contains the elements “apple”, “orange”, and “pear” at that point.
The insertion process consists of three steps:
Step 1:
As long as there are elements on the destination stack, we take them out and call insertAtBottom() recursively. This moves the elements from the destination stack to the call stack:
Step 2:
Once the destination stack is empty, the element to be inserted is placed on the destination stack:

Step 3:
When exiting the recursion, we push the elements from the call stack back to the destination stack:
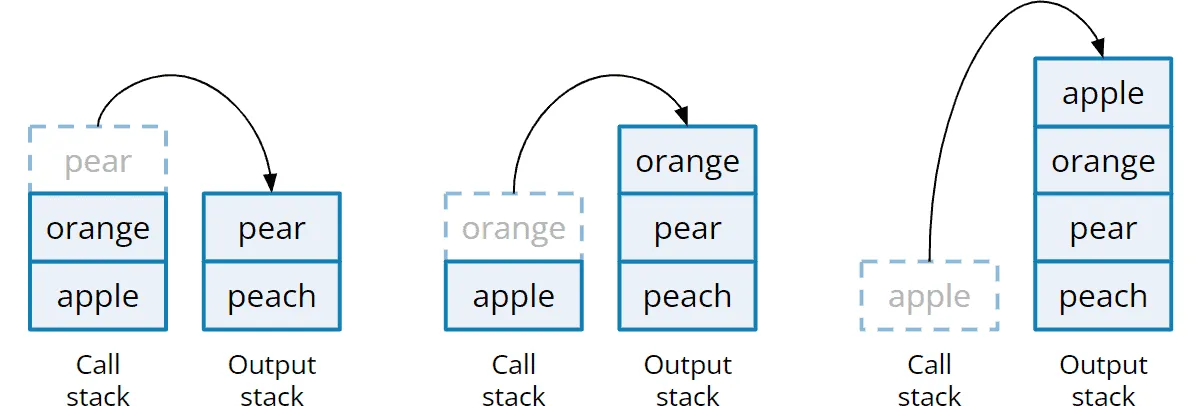
With this, the insertAtBottom() method has done its job. The “peach” element has been inserted at the bottom of the target stack.
Source Code for Stack Reversion by Recursion
The Java source code for reversing the stack consists of only a few lines for the two methods. You can find the code in the Stacks class in the GitHub repo:
public class Stacks {

  public static <E> void reverse(Stack<E> stack) {
    if (stack.isEmpty()) {
      return;
    }
    E element = stack.pop();
    reverse(stack);
    insertAtBottom(stack, element);
  }

  private static <E> void insertAtBottom(Stack<E> stack, E element) {
    if (stack.isEmpty()) {
      stack.push(element);
    } else {
      E top = stack.pop();
      insertAtBottom(stack, element);
      stack.push(top);
    }
  }
}
By the way, I chose the class name Stacks analogous to Java utility classes like Collections and Arrays.
Implementation Using an Interface Default Method
A more modern approach is to implement the methods directly in the Stack interface:
public interface Stack<E> {

  // ...

  default void reverse() {
    if (isEmpty()) {
      return;
    }
    E element = pop();
    reverse();
    insertAtBottom(element);
  }

  private void insertAtBottom(E element) {
    if (isEmpty()) {
      push(element);
    } else {
      E top = pop();
      insertAtBottom(element);
      push(top);
    }
  }
}
You won’t find this variant in the GitHub repository because I didn’t want to confuse you with the reverse() method when I introduced the Stack interface at the beginning of the tutorial.
Conclusion
This concludes the tutorial series on stacks. If you have read all parts, you have learned how a stack works, which stack implementations exist in the JDK, how to implement stacks yourself in different ways, and – in this article – how to reverse a stack via recursion.
If you enjoyed this article, I’d appreciate a review on my ProvenExpert profile.
And if you don’t want to miss a new article, click here and sign up for the HappyCoders newsletter.